Collecting and Displaying Poll Results
Introduction
Use the mgiPoll tag to get opinions and preferences from visitors
to your site. Allow visitors to participate in the poll and/or
simply view the current poll results.
In this example, you will create a poll to measure presidential
nominee preferences.
MGI Tags
Steps
- Create a poll form.
- Create a poll administration page and open it in a text editor.
- Insert the mgiPoll tag in Admin mode.
- Save the poll administration page.
- FTP the poll administration page to the web server running
MGI.
- View the poll administration page in a web browser.
- Add a new poll.
- Add post arguments.
- Add post argument responses.
- Set poll preferences.
- Activate the poll.
- Create a poll results page and open it in a text editor.
- Insert an mgiPoll tag in Collect mode and an mgiPoll tag
in Tally mode.
- Save the poll results page.
- FTP the poll form and poll results page to the web server
running MGI.
- View the poll form in a web browser and complete the poll.
Step 1: Create a poll form.
- Create a form named "poll.mgi" to collect presidential
preferences using form elements such as radio buttons, checkboxes,
and pop-up menus. Text fields and text areas cannot be used to
collect and tally poll data.
-
- Name each form element uniquely. For radio buttons, name
the set of radio buttons with one name and enter a unique value
for each radio button. For checkboxes, name the set of checkboxes
with one name and enter a unique value for each checkbox. If
you name each checkbox separately, they will show up as different
results rather than components of one question. For selects (pop-up
menus), name the pop-up menu uniquely and enter a value for each
option.
-
- The post argument names cannot exceed
35 characters. Post argument names are not shown to the
visitor and can be abbreviated (e.g., "Q1", "Q2",
etc.). The value of the post argument is not limited and may
be any length. The post argument value is shown to the visitor
as a label for poll results with the text entered into the mgiPoll
admin (see Step 10).
-
- If a visitor answers some poll questions, unanswered questions
are tallied as a "No Response" value by default. If
a visitor answers no poll questions, but submits the poll, that
visitor's responses are not tallied. To control how your visitors
answer poll questions, you may choose to include your own "No
Answer" value for each question or you may wish to simply
require an answer to each question by validating each question
on the poll results page (using mgiValidataData or a custom checking
method).
-
- After the form elements, enter a submit button named "Submit".
-
- Enclose all form elements with HTML <FORM> tags and
post the form to the poll results page (results.mgi).
-
- The following is an example poll form with three questions.
<FORM ACTION="results.mgi" METHOD="POST">

<CENTER>

<P><TABLE WIDTH="300" BORDER="0" CELLSPACING="0"
CELLPADDING="5">
<TR>
<TD WIDTH="100%" BGCOLOR="#00ff00">If you had to vote
today, who would you choose to represent the Republican
party in the next presidential election?</TD></TR>
<TR>
<TD WIDTH="100%" BGCOLOR="#ccffcc">
<P><INPUT TYPE="radio" VALUE="John McCain"
NAME="Republican"> John McCain</P>
<P><INPUT TYPE="radio" VALUE="George W. Bush"
NAME="Republican"> George W. Bush</P>
<P><INPUT TYPE="radio" VALUE="Elizabeth Dole"
NAME="Republican"> Elizabeth Dole</P>
<P><INPUT TYPE="radio" VALUE="Other"
NAME="Republican"> Other
</TD></TR>
</TABLE>

<P><TABLE WIDTH="300" BORDER="0" CELLSPACING="0"
CELLPADDING="5">
<TR>
<TD WIDTH="100%" BGCOLOR="#ffff00">If you had to
vote today, who would you choose to represent the
Democratic party in the next presidential election?
</TD></TR>
<TR>
<TD WIDTH="100%" BGCOLOR="#ffffcc">
<P><INPUT TYPE="radio" VALUE="Hillary Clinton"
NAME="Democrat"> Hillary Clinton</P>
<P><INPUT TYPE="radio" VALUE="Dick Gephart"
NAME="Democrat"> Dick Gephart</P>
<P><INPUT TYPE="radio" VALUE="Al Gore"
NAME="Democrat"> Al Gore</P>
<P><INPUT TYPE="radio" VALUE="Other"
NAME="Democrat"> Other
</TD></TR>
</TABLE>

<P><TABLE WIDTH="300" BORDER="0" CELLSPACING="0"
CELLPADDING="5">
<TR>
<TD WIDTH="100%" BGCOLOR="#00ccff">What is your age?
</TD></TR>
<TR>
<TD WIDTH="100%" BGCOLOR="#ccffff">
<SELECT NAME="Age">
<OPTION SELECTED>18 to 25
<OPTION>26 to 35
<OPTION>36 to 45
<OPTION>46 to 55
<OPTION>56 to 65
<OPTION>over 65
</SELECT>
</TD></TR>
</TABLE>

<P><mgiButton value="Submit"></H2>

</CENTER>

</FORM>
Step 2: Create a poll administration page and open it in
a text editor.
- Create a page named "polladmin.mgi" to display
the web-based poll administration interface. Open the poll administration
page in a text editing program that allows you to view and modify
the HTML and code of the page.
Step 4: Insert the mgiPoll tag in Admin mode.
- Insert your cursor after the beginning <BODY> element
and enter the mgiPoll tag and mode parameter. In the mode parameter,
enter "Admin".
<mgiPoll mode="admin">
Step 5: Save the poll administration page.
- Save the changes you have made to the poll administration
page.
Step 6: FTP the poll administration page to the web server
running MGI.
- Upload the poll administration page from your local computer
to the web server using an FTP program.
Step 7: View the poll administration page in a web browser.
- View the poll administration page in a web browser. The first
screen of the web-based, administration interface displays.

Step 8: Add a new poll.
- In the text field under the "Poll Name" column,
enter the case-sensitive poll name
("President" for this example) and click the "Create"
button.

Step 9: Add post arguments.
- Click the "Edit" button beside the poll to access
the post argument interface. For each poll question (i.e., for
each unique post argument) add a post argument to the poll.
-
- In the text field under the "Post Argument Name"
column, enter the post argument name (e.g., "Republican")
and click the "Add" button.

Step 10: Add post argument responses.
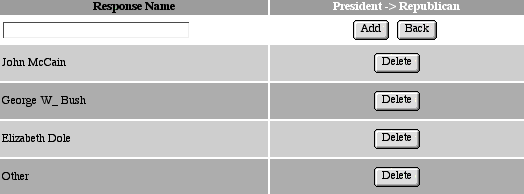
- Add all possible responses for each poll question. Click
the "Edit Responses" button beside the post argument
name to access the post argument response interface. Add a response
for each answer to the selected poll question. To add a response,
enter the post argument value in the text field under the "Response
Name" column and click the "Add" button.
-
- Click the "Back" button to return to the post argument
interface.

Step 11: Set poll preferences.
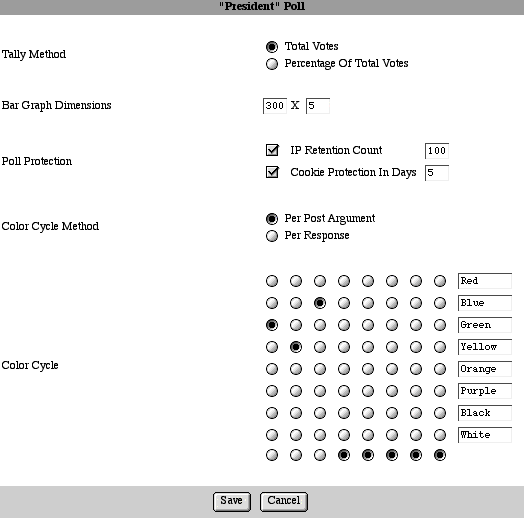
- Return to the first screen of the poll interface. Click the
"Options" button to access the poll preferences. You
may set the method, graph dimensions, protection, color cycle
method, and color cycle.
-
- Select the tally method. The "Total Votes" method
displays results as the raw number of responses for each value.
The "Percentage of Total Votes" method displays the
results the percentage of the total responses for the question.
-
- Enter the width and height (in pixels) of the bar for each
response. If the width is greater than the height, bars are displayed
horizontally for each question. If the height is greater than
the width, bars are displayed vertically for each question.
-
- To prevent visitors from completing the poll multiple times,
set IP or Cookie protection. For IP protection, select the IP
Retention Count checkbox and enter the number of IPs to store.
If a visitor's IP number matches an IP number in the poll database,
the visitor's poll results are not stored or tallied. Once the
poll IP database is full, the oldest IP number in the database
is replaced with the IP number of the next visitor. For cookie
protection, select the Cookie Protection in Days checkbox and
enter the number of days to store a cookie on the visitor's machine.
If a visitor with a poll cookie completes the poll, their poll
results are not stored or tallied.
-
- Select the color cycle method. The "Per Post Argument"
method cycles the specified colors by each question (e.g., the
first question's bars are blue, the second question's bars are
green, etc.). The "Per Response" method cycles the
specified colors by each response (e.g., the first response to
question one is blue, the second response to question one is
green, etc.).
-
- Set the color cycle by choosing the order of colors. In the
first column select the first color, in the second column select
the second color, etc. Only selected colors will be cycled even
if a column is skipped.
-
- Click the "Save" button to apply poll preferences.

Step 12: Activate the poll.
- On the first screen of the poll interface, activate the poll
by clicking the "Activate" button. Poll data cannot
be collected or tallied while the poll is Deactivated. A poll
may be Deactivated for changes, but must be re-Activated before
the poll can proceed. If a visitor attempts to submit to a deactivated
poll, an error message will display indicating that the poll
is not active.
Step 13: Create a poll results page and open it in a text
editor.
- Create a poll results page named "results.mgi"
to collect poll data and display poll results and open the poll
results page in a text editing program that allows you to view
and modify the HTML and code of the page.
Step 14: Insert an mgiPoll tag in Collect mode and an mgiPoll
tag in Tally mode.
- On the poll results page, enter two mgiPoll tags. The first
mgiPoll tag collects poll data and adds it to the poll database.
The second mgiPoll tag displays poll results. If you prefer,
the data collection and results display can be performed on two
different pages.
-
- For data collection, enter the mgiPoll tag and name parameter.
In the name parameter, enter the case-sensitive name of the poll
where data is stored.
-
- For results display, enter the mgiPoll tag, mode parameter
and name parameter. In the mode parameter, enter "Tally".
In the name parameter, enter the case-sensitive name of the poll
to tally and display.
<mgiComment>Collect Poll Data</mgiComment>
<mgiPoll name="President">

<mgiComment>Display Poll Results</mgiComment>
<H2>Poll Results</H2>
<mgiPoll mode="tally" name="President">
Step 15: Save the poll results page.
- Save the changes you have made to the poll results page.
Step 16: FTP the poll form and poll results page to the web
server running MGI.
- Upload the poll form and poll results page from your local
computer to the web server using an FTP program.
Step 17: View the poll form in a web browser and complete
the poll.
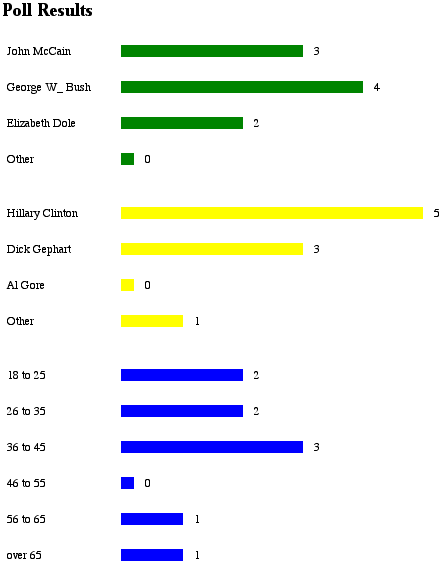
- View the poll form in a web browser. Complete and submit
the poll form. On the results page, your poll information is
added to the poll database and the current poll results are displayed.
For example,

|


