Multiple Username and Password Protection and User Groups
Introduction
The mgiAuthenticate and mgiAuthenticateDB tags password-protect
individual pages of your web site. When a visitor accesses a
page with an mgiAuthenticate or mgiAuthenticateDB tag, the web
browser displays a dialogue box and prompts the user to enter
a username and password. If the correct username and password
are entered, the page displays. If either an incorrect username
or password is entered, an error page displays.
Use the mgiAuthenticate tag to password-protect a page with
one static username and password.
Use the mgiAuthenticateDB tag to password-protect a page with
multiple usernames and passwords. The mgiAuthenticateDB tag can
also be used to provide levels of access via groups. The authentication
tags can only be used to password-protected individual pages.
The authentication tags cannot be used to password-protect entire
directories (folders) unless all pages in the directory contain
the mgiAuthenticate or mgiAuthenticateDB tag.
In this example, password protection is based on two groups,
admin and staff. If a group parameter is not included in the
mgiAuthenticateDB tag, users from any group with a valid username
and password may access the page.
MGI Tags
Steps
- Create an authentication administration page.
- Insert the mgiAuthenticateDB tag in Admin mode.
- Save the authentication administration page.
- FTP the authentication administration page to the web server
running MGI.
- View the authentication administration page.
- Add users.
- Open pages to password protect in a text editor.
- Insert the mgiAuthenticateDB tag and group parameter.
- Save the pages.
- FTP the pages to the web server running MGI.
- View the pages in a browser.
Step 1: Create an authentication administration page.
- Create a page named "authadmin.mgi" to display
the web-based authentication interface. Open the page in a text
editing program that allows you to view and modify the HTML and
code of the page.
Step 2: Insert the mgiAuthenticateDB tag in Admin mode.
- Enter the mgiAuthenticateDB tag and mode parameter. In the
mode parameter enter "Admin". The admin interface will
display at the location of the mgiAuthenticateDB tag.
<mgiAuthenticateDB mode="Admin">
Step 3: Save the authentication administration page.
- Save the changes you have made to the authentication administration
page.
Step 4: FTP the authentication administration page to the
web server running MGI.
- Upload the authentication administration page from your local
computer to the web server using an FTP program.
Step 5: View the authentication administration page.
- The first screen of the authentication administration interface
allows you to add or import users (or search for users if they
already exist). See instruction for importing in the advanced
tutorials.
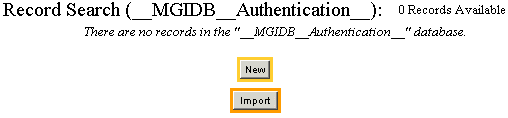
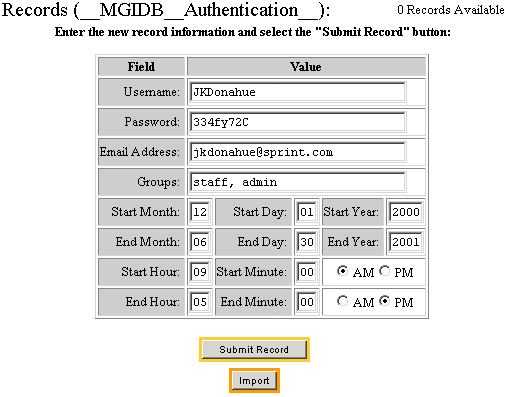
Step 6: Add users.
- To create a new user, click the "New" button. Enter
the new user information in the form that displays.
-
- The username and password fields are required. In the Username
field, enter the user's unique, case-sensitive login identification.
Usernames must be unique, even across groups. Since the username
is case-sensitive, the same name with different capitalization
qualifies as a unique username. In the Password field, enter
the user's case-sensitive security code.
-
- In the Email Address field, enter the user's email address.
The email address can be used to send the user's password if
it is forgotten.
-
- In the Groups field, enter the group name that the user belongs
to. For multiple groups, enter a comma-delimited list in the
Groups field.
-
- In the start date fields, enter the numeric month, day and
4-digit year when the user's username and password become valid.
In the end date fields, enter the numeric month, day and 4-digit
year when the user's username and password are no longer valid.
To give a user access for all dates, leave the start and end
date fields blank - they will default automatically.
-
- In the start time fields, enter the time that the user's
username and password become valid on the start date. In the
end time fields, enter the time that the user's username and
password are no longer valid on the end date. To give a user
access for all times, leave the start and end time fields blank
- they will default automatically.
-
- Click "Submit Record" to add the user. The message
"Record successfully added." and a blank form for adding
additional users displays when the addition is complete.
Step 7: Open pages to password protect in a text editor.
- Open any page you wish too password protect in a text editing
program that allows you to view and modify the HTML and code
of the page.
Step 8: Insert the mgiAuthenticateDB tag and group parameter.
- Enter the mgiAuthenticateDB tag and group parameter. In the
group parameter, enter the name of the group that is allowed
to access the page. You may enter only one group name. If the
group parameter is not included, a user from any group with a
valid username and password may access the page.
<mgiAuthenticateDB group="staff">
Step 9: Save the pages.
- Save the changes you have added to password protected pages.
Step 10: FTP the pages to the web server running MGI.
- Upload the password protected pages from your local computer
to the web server using an FTP program.
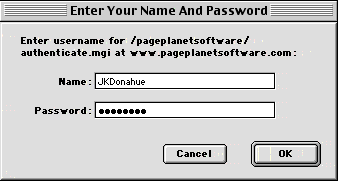
Step 11: View the pages in a browser.
- View a password protected page in a browser. A dialogue box
prompts you for your username and password. If you enter a valid
username and password, the page displays. If you enter a valid
username and password, but you are not a member of the specified
group, an error displays. If you enter an invalid username or
password, an error displays.
Comments and Notes
Usernames and passwords are both case-sensitive.
When you distribute a username and password, note the importance
of capitalization to the recipient.
|