The mgiAuthenticateDB Tag
Admin Mode
Return to the mgiAuthenticateDB
Main Menu
Tag Syntax
The Admin mode of mgiAuthenticateDB has one required parameter
and four optional parameters. The tag form is:
<mgiAuthenticateDB mode="Admin" advancedSearch="On/Off"
headerColor="Hex Code" odbcDatasource="Source Name"
odbcUsername="Name" odbcPassword="Password">
Required Parameters:
- mode - The mode is the function that the mgiAuthenticateDB
tag performs. In "admin" mode, the mgiAuthenticateDB
tag creates a web-based interface that allows you to manage specific
users and groups of users.
Optional Parameters:
- advancedSearch - The advancedSearch parameter determines
whether the advanced search feature is available in the web-based
administration interface. The advanced search feature allows
you to enter complex search strings that are not available with
the built-in search functions (e.g., "NOT" searches,
"OR" searches, searching the same field multiple times,
etc.). The search time will increase as the search complexity
increases. If the advancedSearch parameter value is "On",
then the advanced search field is displayed in the search screen
of the admin interface. If the advancedSearch parameter value
is "Off", then the advanced search field is
not displayed in the search screen of the admin interface. The
default value is "Off".
- headerColor - The headerColor parameter is the hex
code (without the # symbol) of the color for the header table
cells in the admin display of mgiAuthenticateDB. The default
color is "cccccc" (gray).
- odbcDatasource (NT only) - The odbcDatasource is the name of
datasource on the server that provides access information for
an external ODBC database. If the odbcDatasource parameter is
included, authentication information will be stored in the specified
ODBC database rather than the internal MGI database. Inquire
with the server administrator for additional information about
the use of ODBC databases. If you include
the odbcDatasource parameter, the odbcUsername and odbcPassword
parameters are required.
- odbcUsername (NT only) - The odbcUsername is the username required
to access the ODBC datasource. The odbcUsername
parameter is required if you include the odbcDatasource parameter.
- odbcPassword (NT only) - The odbcPassword is the code required
to access the ODBC datasource. The odbcPassword
parameter is required if you include the odbcDatasource parameter.
Example Usage and Output
<mgiAuthenticateDB mode="admin" advancedSearch="Yes">
In admin mode, the mgiAuthenticateDB tag dynamically creates
and displays a web-based interface to manage authentication information
for specific users and groups of users.
Adding New Users (see Importing below)
The first time you access a page with the mgiAuthenticateDB
tag in admin mode, buttons for creating a new user and importing
users display.

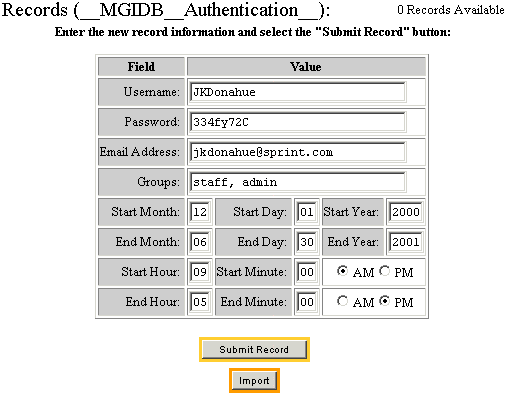
To create a new user, click the "New" button. Enter
the new user information in the form that displays. The username
and password fields are required. In the Username field, enter
the user's unique, case-sensitive login identification. In the
Password field, enter the user's case-sensitive security code.
In the Email Address field, enter the user's email address. The
email address will be used to send the user's password in SendPassword
mode. In the Groups field, enter the group name that the user
belongs to. For multiple groups, enter a comma-delimited list
in the Groups field. In the start date fields, enter the numeric
month, day and 4-digit year when the user's username and password
become valid. In the end date fields, enter the numeric month,
day and 4-digit year when the user's username and password are
no longer valid. In the start time fields, enter the time that
the user's username and password become valid on the start date.
In the end time fields, enter the time that the user's username
and password are no longer valid on the end date. Click "Submit
Record" to add the user. The message "Record successfully
added." is displayed when the addition is complete and a
blank form for adding additional users is displayed.
Searching Authentication Records
When there is one or more users in the authentication database,
the options for searching or browsing the records are available
at the bottom of the admin interface. When you access the mgiAuthenticateDB
admin with existing users, the search form is displayed by default.
At any location in the admin interface, click the "Search"
button to display the search form. Search for a specific user
by entering search criteria in the Username, Password, Email
Address and/or Groups fields under the Value column. To perform
partial searches, enter an asterisk (*) for a wildcard value.
For example, to search with all usernames beginning with the
letter "B", enter "B*" in the Username field.
Search criteria is not case-sensitive. To view all authentication
records, leave the search criteria in all fields blank. To order
your search results using the Username, Email Address, or Groups
field, select the radio button beside the appropriate field in
the Order column. Search results are displayed in ascending order
(A to Z, smallest to largest) by default. To display search results
in descending order (Z to A, largest to smallest), click the
checkbox beside the appropriate field in the Rev column. Search
results are displayed 25 per page by default. To display greater
or fewer search results per page, enter a value in the Results
Per Page field. To search, click the "Search Now" button.
To view a specific record in the search results, select the radio
button beside the record and click the "View" button.
Browsing Authentication Records
To browse authentication records, click the "First"
button. The first authentication record appears. To view the
next authentication record, click the ">>" button.
To view the previous authentication record, click the "<<"
button.
Modifying Authentication Records
To modify an authentication record, locate the record by searching
or browsing for the record. Change the information in any field
and click the "Save" button.
Importing and Exporting
Tab-delimited user information can be imported into the authentication
database. To import new users, create a tab-delimited file with
columns in this order: Username, Password, Email Address, Groups,
Start Date, End Date, Start Time and End Time. A username and
password is required for each user. For the Username, enter the
user's unique, case-sensitive login identification. For the Password,
enter the user's case-sensitive security code. For the Email
Address, enter the user's email address. The email address will
be used to send the user's password in SendPassword mode. For
the Groups, enter the group name that the user belongs to. For
multiple groups, enter a comma-delimited list in the Groups field.
For the start date, enter the julian date when the user's username
and password become valid. For the end date, enter the julian
date when the user's username and password are no longer valid.
For the start time, enter the time (in military format) that
the user's username and password become valid on the start date.
For the end time, enter the time (in military format) that the
user's username and password are no longer valid on the end date.
To import, click the "Import" button. In the FileName
field, enter the name of the tab-delimited file on the server
that contains your import information. Click the "Import
Now" button to import the users. If a username in your import
file matches an existing username in the authentication database,
the user's information is not imported.
MGI exports authentication records in tab-delimited text form.
Exported authentication records are not encrypted. To
export records, click the "Export" button. Enter the
name of a new file to contain your authentication records and
click the "Export Now" button. Warning:
An export file will overwrite an existing file of the same name!
Deleting Records
To delete an individual authentication record, locate the
record by searching or browsing for the record. Click the "Delete"
button. Verify that you intended to delete the record by clicking
the "Yes" button.
To delete all authentication records, click the "Delete
All" button. Verify that you intended to delete the record
by clicking the "Yes" button.
Return to the mgiAuthenticateDB
Main Menu
|