Importing Authentication Data
Introduction
MGI stores usernames, passwords, and other authentication
data in a proprietary database format for the database that is
built into the MGI code. However, you can use the export and
import features of the mgiAuthenticateDB tag in admin mode to
transfer authentication records. Passwords are stored in encrypted
format in the internal "__MGIDB__Authentication__"
database. Do not import records using the mgiEditDatabase tag
or the passwords will import in plain text (and will erroneously
decrypt in the admin). The mgiAuthenticateDB tag in admin mode
will encrypt passwords as they are imported .
MGI Tags
Steps
- Create an authentication administration page.
- Insert the mgiAuthenticateDB tag in Admin mode.
- Save the authentication administration page.
- Create a tab-delimited import file.
- Save the import file.
- FTP the authentication administration page and import file
to the web server running MGI.
- View the authentication administration page.
- Import Users.
Step 1: Create an authentication administration page.
- Create a page named "authadmin.mgi" to display
the web-based authentication interface. Open the page in a text
editing program that allows you to view and modify the HTML and
code of the page.
Step 2: Insert the mgiAuthenticateDB tag in Admin mode.
- Enter the mgiAuthenticateDB tag and mode parameter. In the
mode parameter enter "Admin". The admin interface will
display at the location of the mgiAuthenticateDB tag.
<mgiAuthenticateDB mode="Admin">
Step 3: Save the authentication administration page.
- Save the changes you have made to the authentication administration
page.
Step 4: Create a tab-delimited import file.
- Depending on the current format of your data, you may need
to "export" or "save as..." from an existing
program in order to create a tab-delimited file. If you choose,
you may also prepare your data directly in a text file. In any
case, create a text file of the tab-delimited authentication
data to import.
-
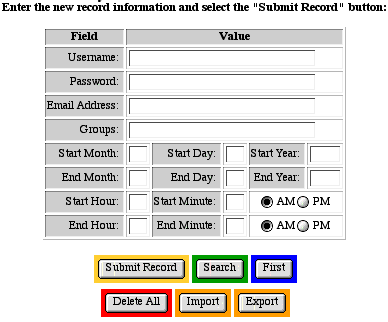
- Your data should be in the following field order and format:
- Username
- Password
- Email Address
- Group
- Start Date (in Julian Day format)
- End Date (in julian Day format)
- Start Time (in military format)
- End Time (in military format)
-
- At least a username and password is required for each user.
-
- For the Username, enter the user's unique, case-sensitive
login identification. For the Password, enter the user's case-sensitive
security code. For the Email Address, enter the user's email
address. The email address will be used to send the user's password
in SendPassword mode. For the Groups, enter the group name that
the user belongs to. For multiple groups, enter a comma-delimited
list in the Groups field. For the start date, enter the julian
date when the user's username and password become valid. For
the end date, enter the julian date when the user's username
and password are no longer valid. For the start time, enter the
time (in military format) that the user's username and password
become valid on the start date. For the end time, enter the time
(in military format) that the user's username and password are
no longer valid on the end date.
-
- The first line of your import file should be the authentication
database field definitions and names. Note that there are tabs
between each field name and a carriage return (Mac) or carriage
return and line feed (PC) at the end of the first line which
may not copy directly from the example below..
-
- (T,50,X,Q)Username (T,90,X)Password (T,130,X)Email Address
(T,250,X)Groups (I)Start Date (I)End Date (I)Start Time (I)End
Time
-
- The following is an example import file. The text in this
example is wrapped for viewing purposes, however each record
is actually only one row of tab-delimited text. The triangles
in this example represent tabs and the horizontal lines as the
end of each row represent a carriage return.

Step 5: Save the import file.
- Save the import file. In this example the import file is
named "authimport.txt", but you may choose any name.
Step 6: FTP the authentication administration page and import
file to the web server running MGI.
- Upload the authentication administration page and import
file from your local computer to the web server using an FTP
program.
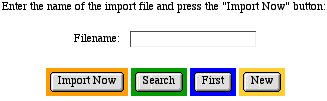
Step 7: View the authentication administration page.
- The first screen of the authentication administration interface
is the search screen if there is existing data or a "New"
and "Import" button if there is no existing data. Click
the "Import" button to view the import screen.
Step 8: Import Users.
- Beside "Filename", enter the name of the file to
import and click the "Import Now" button. Imported
users are added to the existing users in the database. If a
username in the import file exactly matches an existing username
in the authentication database, the user's information is not
imported. When the import is complete, the main interface displays.
|