Importing Database Records into an Existing Database or to
Create a New Database
Introduction
MGI stores database information in a proprietary database
format for the database that is built into the MGI code. However,
you can use the export and import features of the mgiEditDatabase
tag to move database records between different programs or to
easily edit existing data or database structures.
A file must be in a tab-delimited format in order to import.
MGI cannot import any other formats, however tab-delimited is
a common, standard format for database and spreadsheet programs
(e.g., MS Excel, FileMaker, etc.).
You may import record data into an existing database structure
(i.e., add records to a database) or you may have MGI create
a new database structure (i.e., create fields and add records)
during the import. Creating a new database with a simple import
is ideal for minor adjustments in the database structure.
MGI Tags
Steps
- Create a database administration page in a text editor.
- Insert the mgiEditDatabase tag.
- Save the database administration page.
- Create a tab-delimited import file.
- Save the import file.
- FTP the database administration page and import file to the
web server running MGI.
- View the database administration page in a web browser.
- Select an existing database or create a new database.
- Import the file.
Step 1: Create a database administration page in a text editor.
- Create a new page in a text editing program to display the
web-based, database administration interface.
Step 2: Insert the mgiEditDatabase tag.
- On the database administration page, enter the mgiEditDatabase
tag.
<mgiEditDatabase>
Step 3: Save the database administration page.
- Save the database administration page and name it "dbadmin.mgi".
Step 4: Create a tab-delimited import file.
- Depending on the current format of your data, you may need
to "export" or "save as.." from an existing
program in order to create a tab-delimited file. If you choose,
you may also prepare your data directly in a text file. In any
case, create a text file of tab-delimited data to import.
-
- Next, enter the field definitions and field names as the
first row in your import text file. Field definitions should
be written within parentheses and the field name should be to
the right of the parentheses (no space). Field names are case-sensitive.
Each type of MGI field (text, long text, boolean, etc.) is represented
by a letter:
- B - True/False (Boolean)
- I - Whole Number (Integer)
- U - Positive Number (Unsigned Integer)
- N - Decimal Number (Multi-Precision Float)
- T - Text
- L - Long Text
- Text and decimal number fields are followed by a comma and
the specified number of characters (text) or decimal places (decimal
number). Field definitions followed by a comma and an "X"
are indexed. Field definitions followed by a comma and a "Q"
are unique. All lines in the file should end with a carriage
return (Mac) or carriage return/line fee (NT).
-
- The field definitions and names should also be tab-delimited
and should match the order of your tab-delimited data. However,
the fields are not required to match the order of an existing
database structure - fields will be matched during import even
if they are in a different order. If your field order does
match the field order in your existing database, the easiest
way to get the field definitions and names is to export the existing
database structure in MGI, then copy and paste the field definition
line to the top of your import file!
-
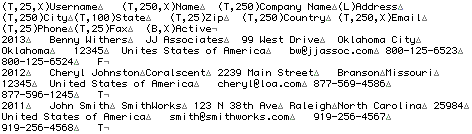
- The following is an example import file. The text in this
example is wrapped for viewing purposes, however each record
is actually only one row of tab-delimited text. The triangles
in this example represent tabs and the horizontal lines as the
end of each row represent a carriage return.
Step 5: Save the import file.
- Save the import file. In this example the import file is
named "import.txt", but you may choose any name.
Step 6: FTP the database administration page and import file
to the web server running MGI.
- Upload the database administration page (dbadmin.mgi) and
import file (import.txt) from your local computer to the web
server using an FTP program.
Step 7: View the database administration page in a web browser.
- View the database administration page (dbadmin.mgi) in a
browser. The first screen of the web-based, administration interface
is displayed.
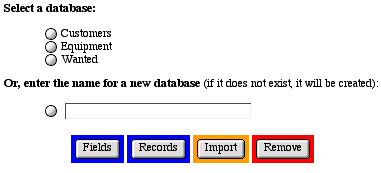
Step 8: Select an existing database or create a new database.
- To import data and add records to an existing database, select
a database and click the "Records" button, then click
the "Import" button on the record screen of the administration
interface. The import screen of the administration interface
displays.
-
- To create a new database structure (create fields and add
records) during the import, create a new database by enter a
database name under "Or, enter the name for a new database"
and click the "Import" button. Database names are case-sensitive.
The import screen of the administration interface displays.
Step 9: Import the file.
- Whether you are adding to an existing database or creating
a new database structure, the import screen of the administration
interface is the same (except for addition buttons in the first
version).
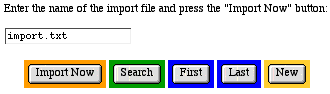
- Enter the name of the import file in the text box and click
the "Import Now" button to import. Any import errors
will be displayed or you will return to the record screen of
the administration interface when the import is complete. The
total number of records in a database is located in the upper
right corner of all record screens.
Comments and Notes
The mgiEditDatabase tag gives you and anyone who views the
page in a web browser access to modify databases. Keep your databases
secure by password-protecting
the database administration page with an mgiAuthenticate
or mgiAuthenticateDB
tag.
|