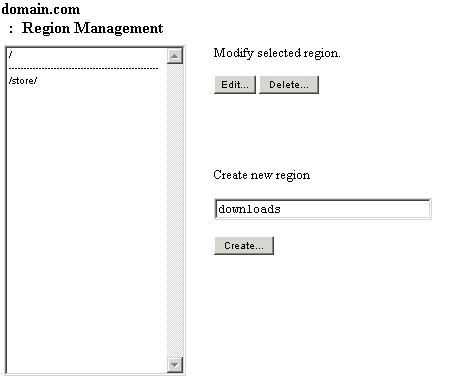
MGI Domain Admin - Region ManagementMGI region management allows you to manage regions of a domain and specify the language, the handling of errors, file uploads, the availability of tags in each MGI module, and the global region settings for specific MGI tags. Region ManagementIn MGI, a region is defined as a subsection of one web site (i.e., a subfolder of the web site). Regions specified in the Region Management list restrict file paths within the region to the root of the region (i.e., a file path cannot walk "up and out" of a defined region) and restrict database access and other settings to the region. Regions can be created to separate access and settings between sub-folders of a web site. For example, if you need to separate database access for different divisions of a company that are sub-folders of a web site, you could create a region for each division. For the majority of web sites, shared access within a domain is preferred and allowed, therefore the default region (/ - the root level) is used. To add a region, enter the region (sub-folder) path under "Create new region" and click the "Create..." button. The region path is based on your virtual host mapping. A region is any sub-folder under the mapping level of the domain for the region. For example, if your virtual host "domain.com" maps to the folder "/domain/" and you want to create a region for "/domain/store/", then you would enter "store" as the region path. However, if you have the domain "store.domain.com" mapped to the folder "/domain/store/", then the "store" folder is actually the root level ("/") of that domain.
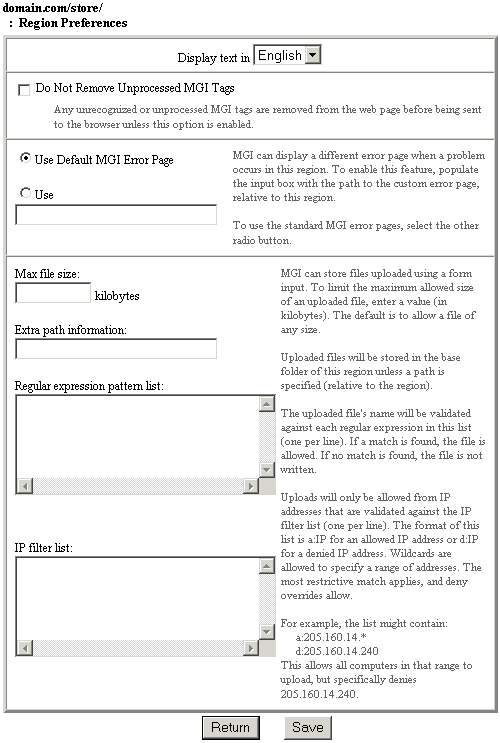
Region PreferencesRegion preferences allow you to specify the language, the handling of errors, file uploads, the availability of tags in each MGI module, and the global region settings for specific MGI tags. Unprocessed MGI Tags If an MGI tag is mis-named or not available to the specified domain, MGI can pass the tag through or remove the tag from the page before it is served. To allow the tag to be passed through, click the checkbox beside "Do Not Remove Unprocessed MGI Tags" and click the "Save" button. To have the tag removed, unclick the checkbox beside "Do Not Remove Unprocessed MGI Tags" and click the "Save" button. Embedded Error Checking By default MGI does not check for errors in MGI tags that are embedded in HTML. To have MGI check and report errors in embedded tags, check the box beside the "Report Errors in Embedded MGI Tags". Warning: MGI may find embedding errors in scripts such as Javascript which are not actually errors and are acceptable coding. To remedy this problem, add spaces to the script near embedded tags (after open brackets "<") or turn this option off. Error PagesWhen MGI encounters an error, an error page is displayed. The default MGI error page is named "Wow! I bet you didn't expect to see this..." followed by the specific error and suggestions for remedy of the error. If there is a mistake in MGI code, the error page will highlight the code being processed in red to facilitate de-bugging. Custom error pages have the option of displaying any or all parts of an error using the mgiGetErrorParameter tag. To use the default MGI error page for the region, click the radio button beside "Use Default MGI Error Page" and click the "Save" button. To use a custom error page in the region, click the radio button beside "Use...", enter the path to the custom error page (relative to the root of the region), and click the "Save" button. HTTP File UploadsMGI supports file uploads from HTML file input elements. In the Region Preferences, you may set a maximum file size for uploaded files, a specific folder for uploaded files, a validation for file names and allow or deny IP addresses (including wildcards). To set a maximum file size, enter the maximum file size in kilobytes under "Max file size:" and click the "Save" button. To specify a folder for uploaded files, enter the path to the folder (relative to the root of the region) under "Extra path information:" and click the "Save" button. To validate the file name before files are uploaded, enter one or more regular expression patterns under "Regular expression pattern list" and click the "Save" button. See the regular expression symbol list for more information. For security resons you are required to list at least one IP address for file uploads, although you can use wildcard values. To allow an IP address, enter an "A" followed by a colon and the IP address (e.g., "a:205.160.14.88"). To deny an IP address, enter a "D" followed by a colon and the IP address (e.g., "d:205.160.14.99"). You may use an asterisk (*) for a wildcard value in any position of the IP address. For example, to allow all IP numbers from the 272 Class C block, you would enter "a:272.*.*.*" as a filter. For multiple filters, enter one filter per line. When a file upload request is received, the most restrictive match for the IP address will be processed and if two filters match, a deny filter will override an accept filter. For example, if you wish to allow all IPs from the 205.160.14 address except the IP address "205.160.14.233", then you would enter an allow and deny statement in the IP filter list ("a:205.160.14.*" and "d:205.160.14.233"). To allow all IP addresses, use wildcard values for all positions (i.e., "a:*.*.*.*").
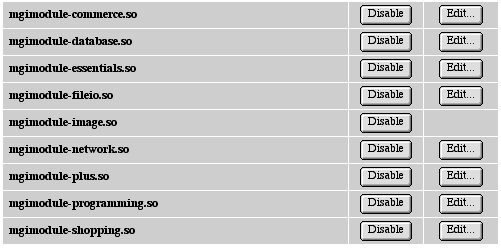
Region Module PreferencesAt the bottom of the Region Preferences window the modules available for the selected region are listed. A module disabled in the Domain Management window will not be listed in the Region Preferences window. By default the region has access to all modules. To disable the region's access to a module, click the "Disable" button beside the module. When disabled the module name displays in plain text with a line through the name. To enabled a module, click the "Enable" button beside the module. When enabled the module name displays in bold text. Module management at the region level affects only the specified region and does not affect the server module settings, the domain module settings or module settings for other regions.
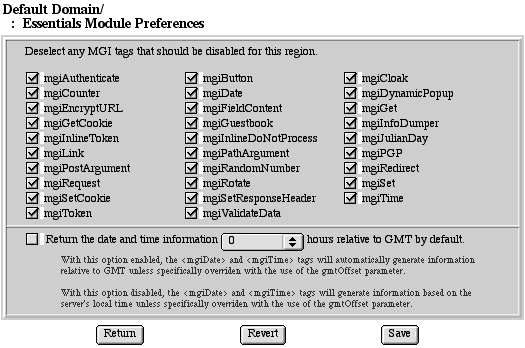
To configure the module preferences, click the "Edit..." button beside the module name. Under the Module Preferences window, the MGI tags in each module are listed. By default the region has access to all tags in each module. To disable access to a specific MGI tag within a module, uncheck the box beside the tag name and click the "Save" button. To enabled an MGI tag within a module, check the box beside the tag name and click the "Save" button or click the "Revert" button to return all settings to default. Additional settings for specific MGI functions such as database search result limits, date and time GMT offsets, and mail server settings may also be entered in the module preferences. If you change the module preferences, click the "Save" button to save the settings. Preference changes take effect immediately.  |


